
Welcome to the Ongrano Blog Pro installation guide.
In this article, we will examine the process from the installation of the Plugin to the first blog post. For better understanding, we will describe all the stages with pictures. Let's take a look at how to install the best blog plugin for Shopware 6.
In the first stage, we will start to describe our plugin assuming you downloaded it from the Shopware Store. If you don't know where to download it. You can find Ongrano Blog Pro here.
Our first step is to activate and configure our plugin.
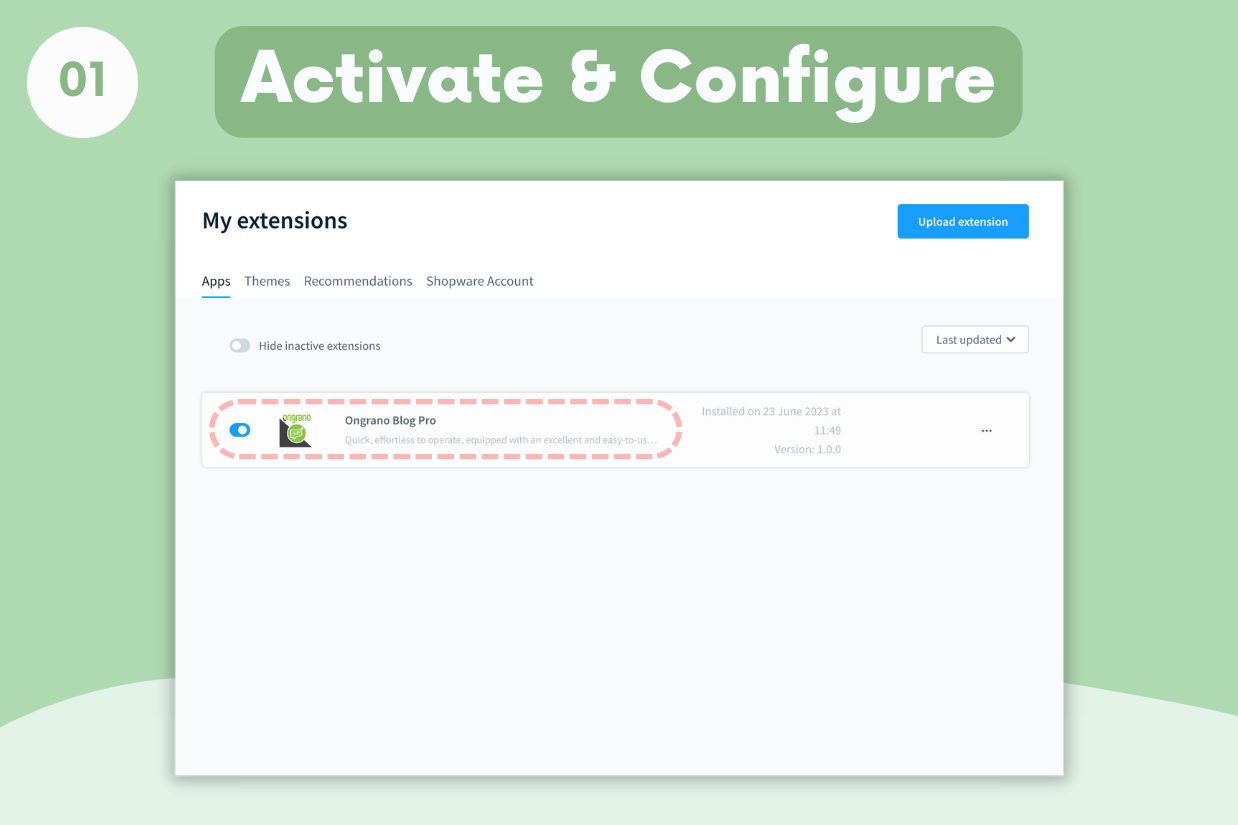
As you can see in the picture, we start by activating our plugin.
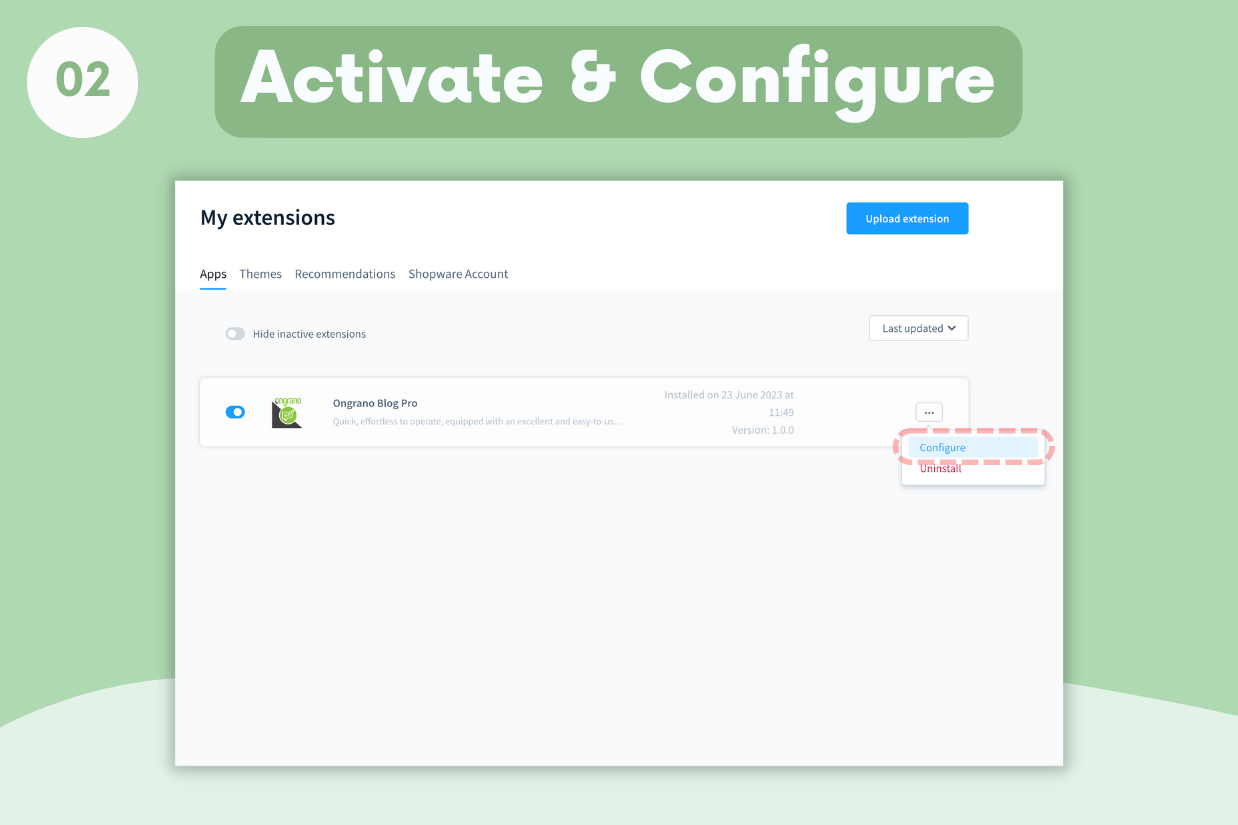
We will go to the Ongrano Blog Pro configuration page with the configure button that we clicked on the dropdown.
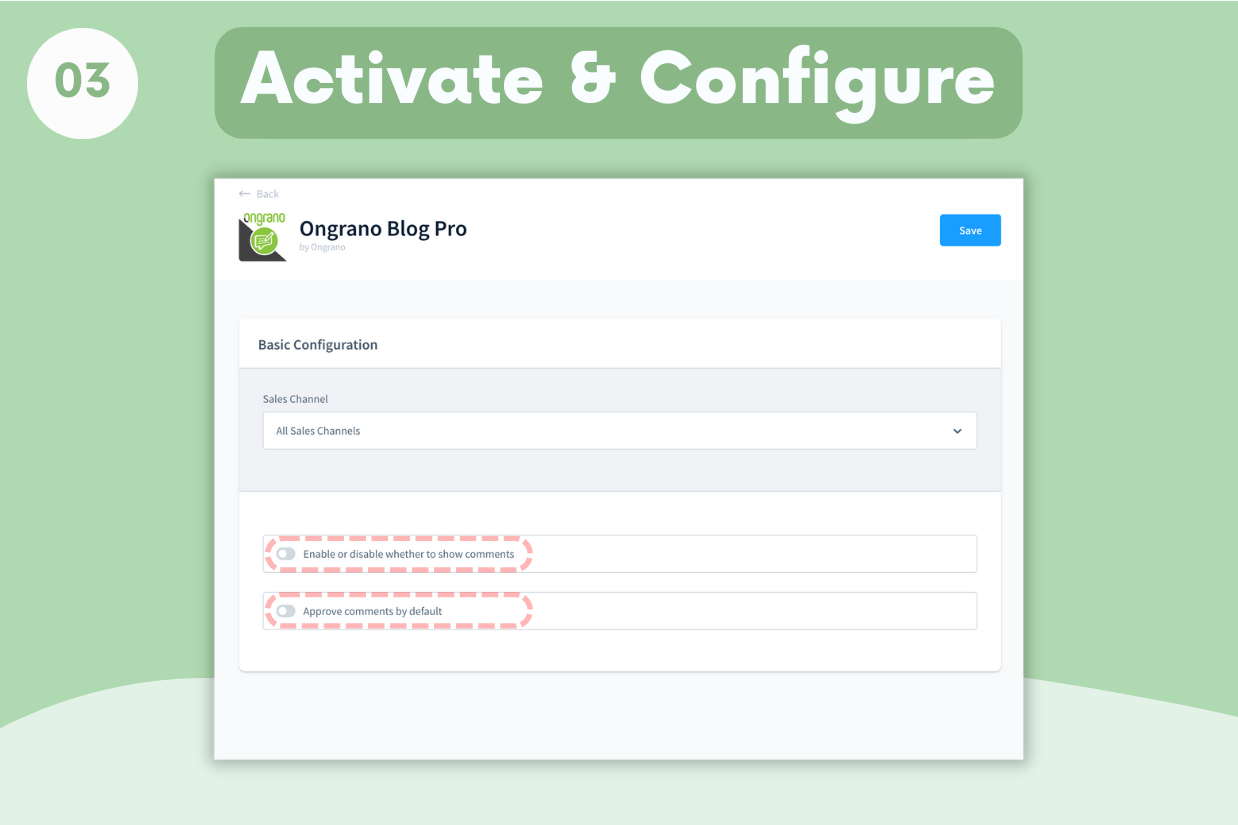
Here you will see the settings for the commenting feature in Blog Pro. The first of these is the activation setting of the comment feature. The second is the setting of whether the comments made on the blog pages should be verified or made immediately visible to end users.
Creating Category Link for blog page
Blog Pro always works in your store's https://your-store.de/blog url address. Here we will define the destination address in one of the navigations for internal linking. This navigation can be defined in your store's main navigation, footer navigation or service navigation. In this example, we will create a blog internal link in the main navigation, that is, in the menu of our store.
Tip: It will be more beneficial for SEO if you can set a place for the blog in the main navigation. Of course, you should adjust this according to your needs.
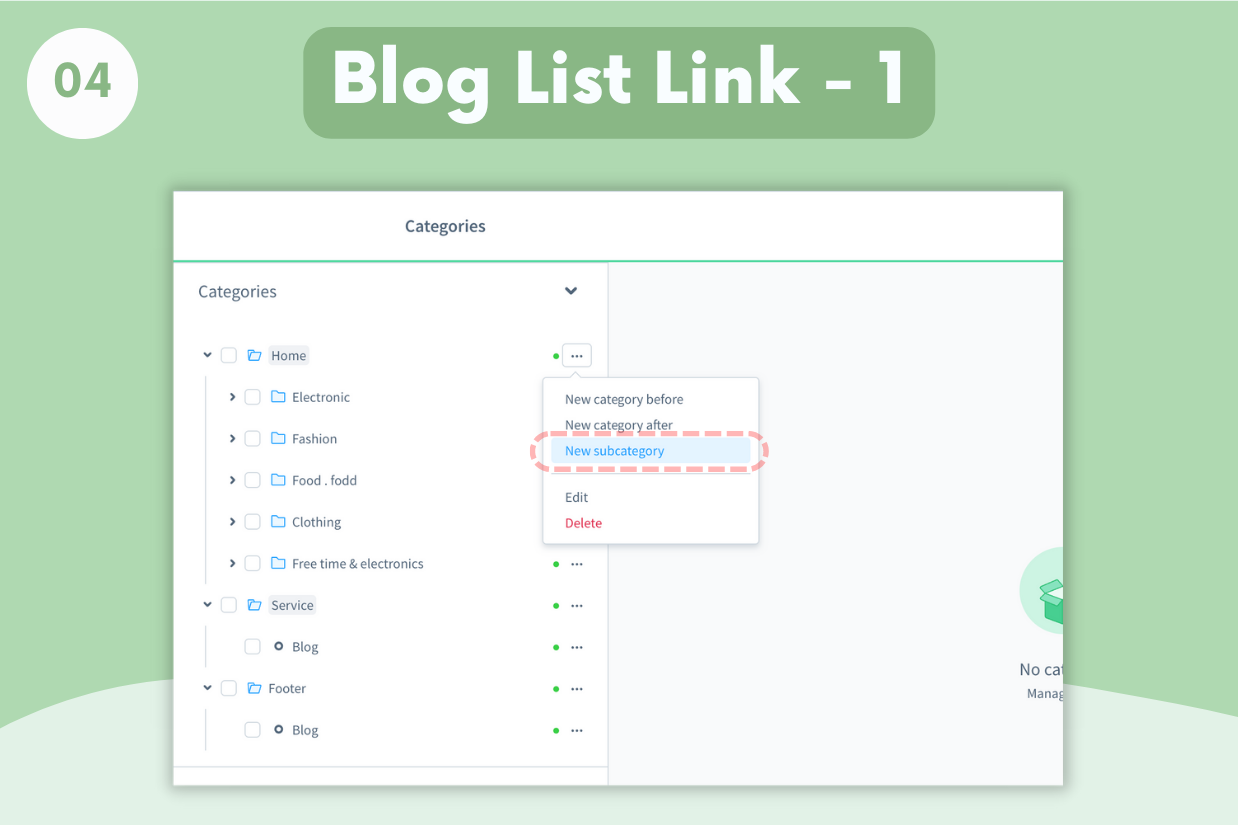
In our category page, we create a subcategory within the category in which we want to show our blog page. For this, we click on New Subcategory from the dropdown menu of the relevant category.
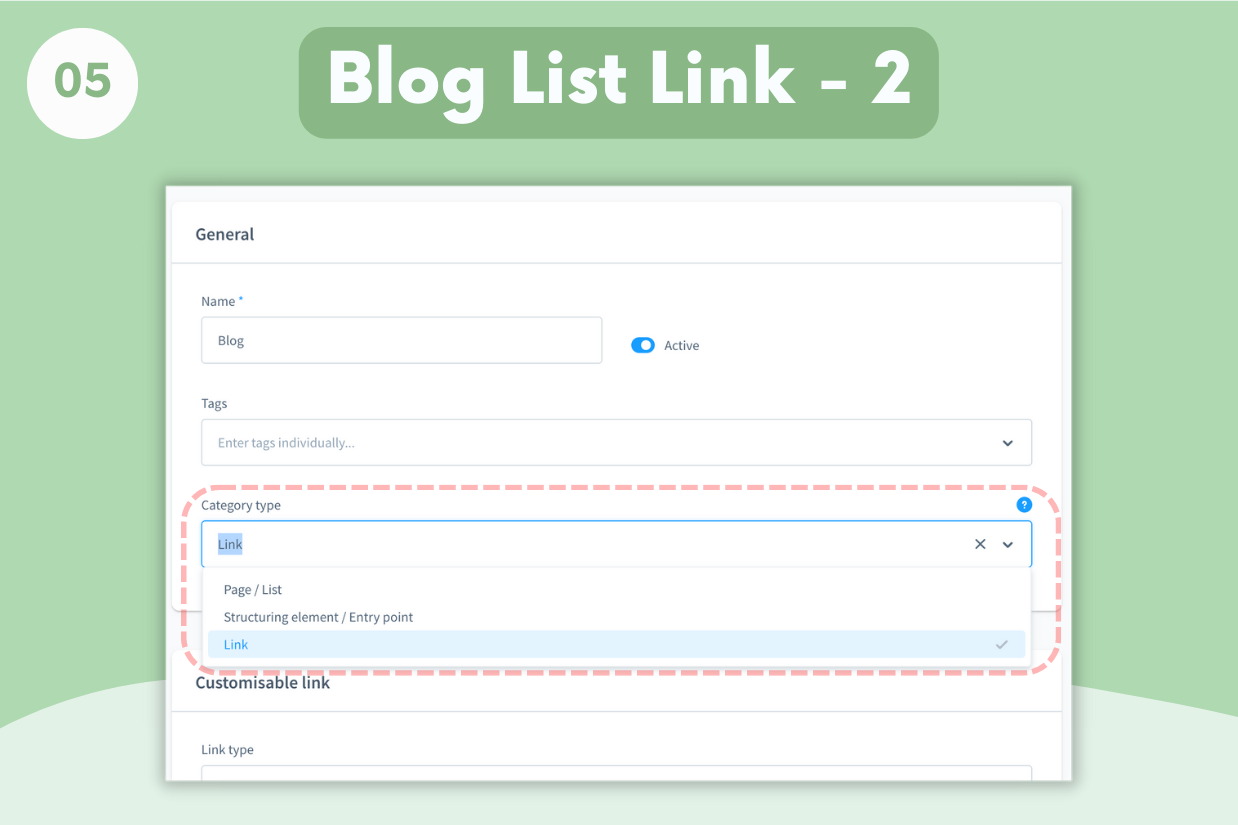
We name the category we created and activate it. In this example we name the Blog and then select the Category type as Link.
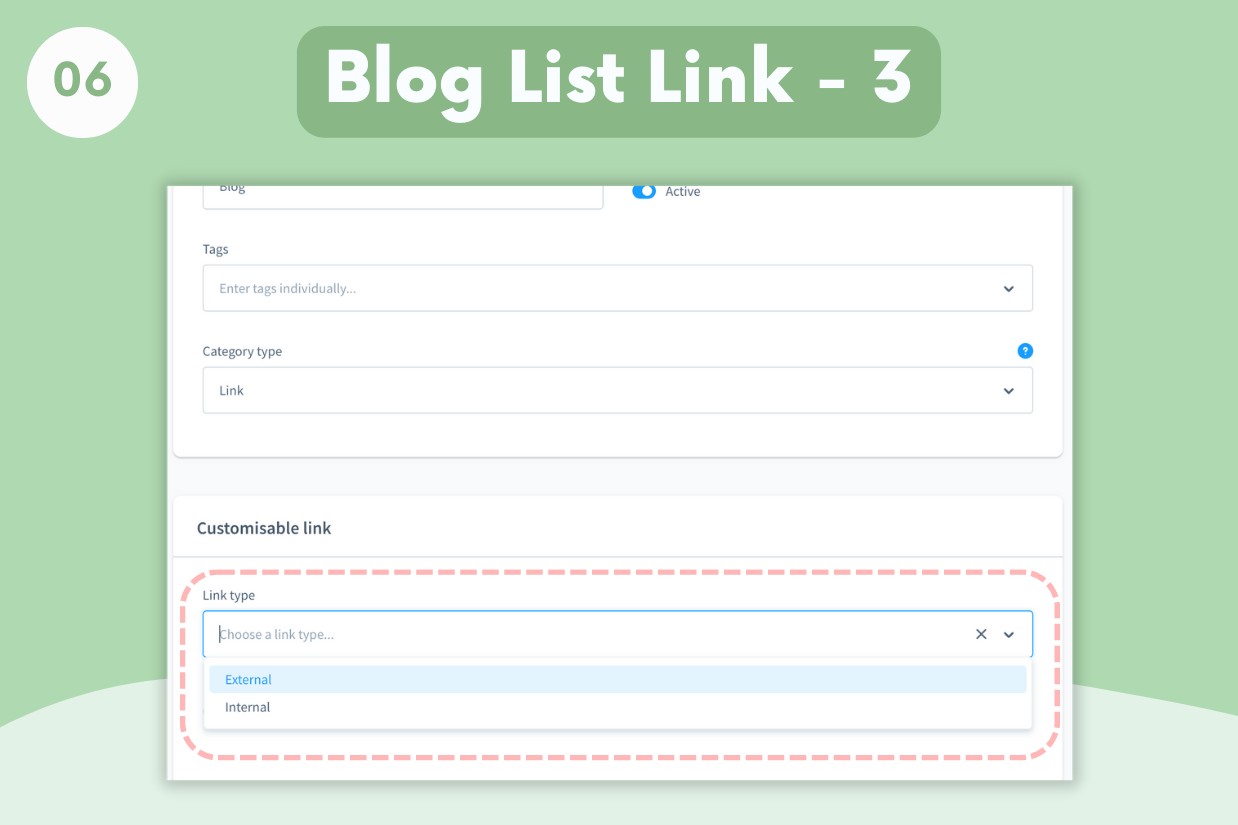
And then we select the External as Link type in Customisable link area
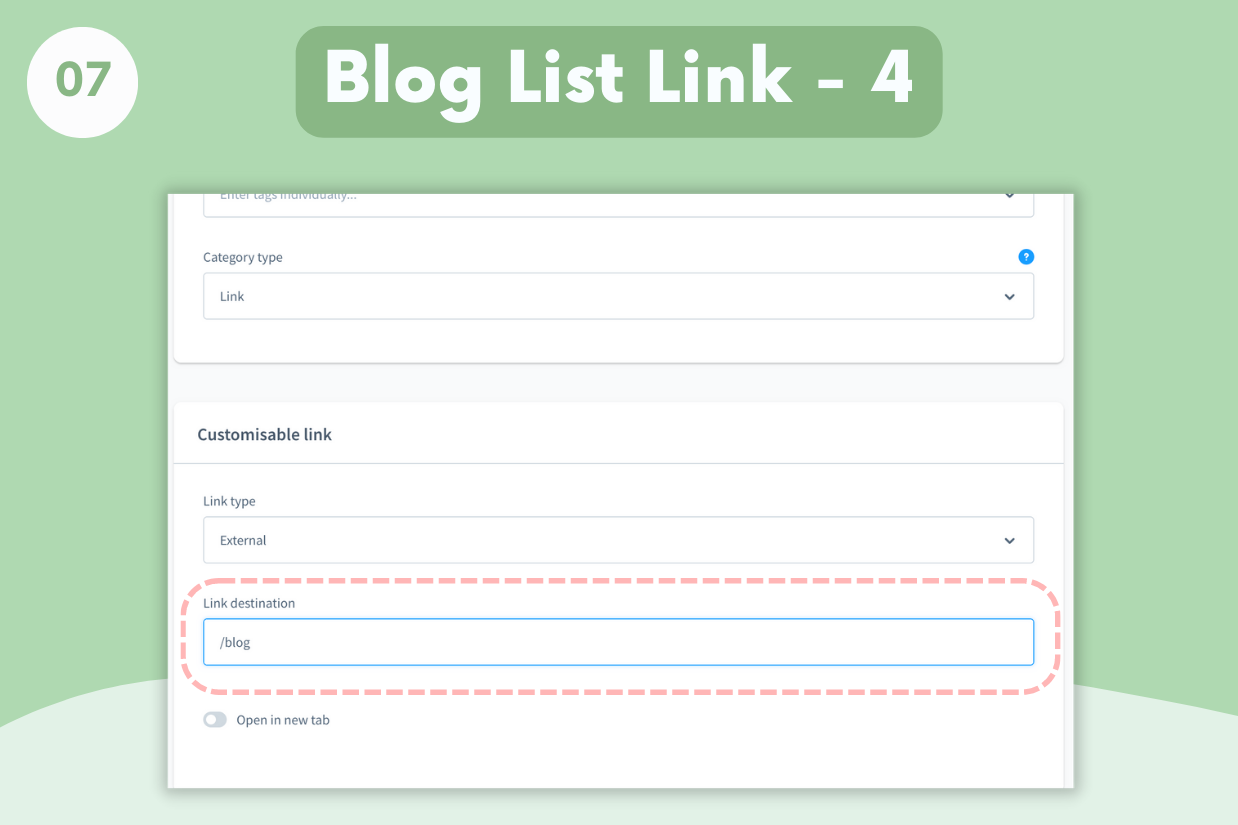
And then we write /blog in the Link destination field. Thus, we have done our link configuration. We can now access the blog from the relevant navigation.
Setting up Image Resolution for Blog Images
Images in your store use different resolutions for different devices and different areas. Shopware creates different resolutions of the same image for us. In this section, we will optimize fast page openings by adding new resolutions. Thus, we will make a positive contribution to the page load speed for SEO.
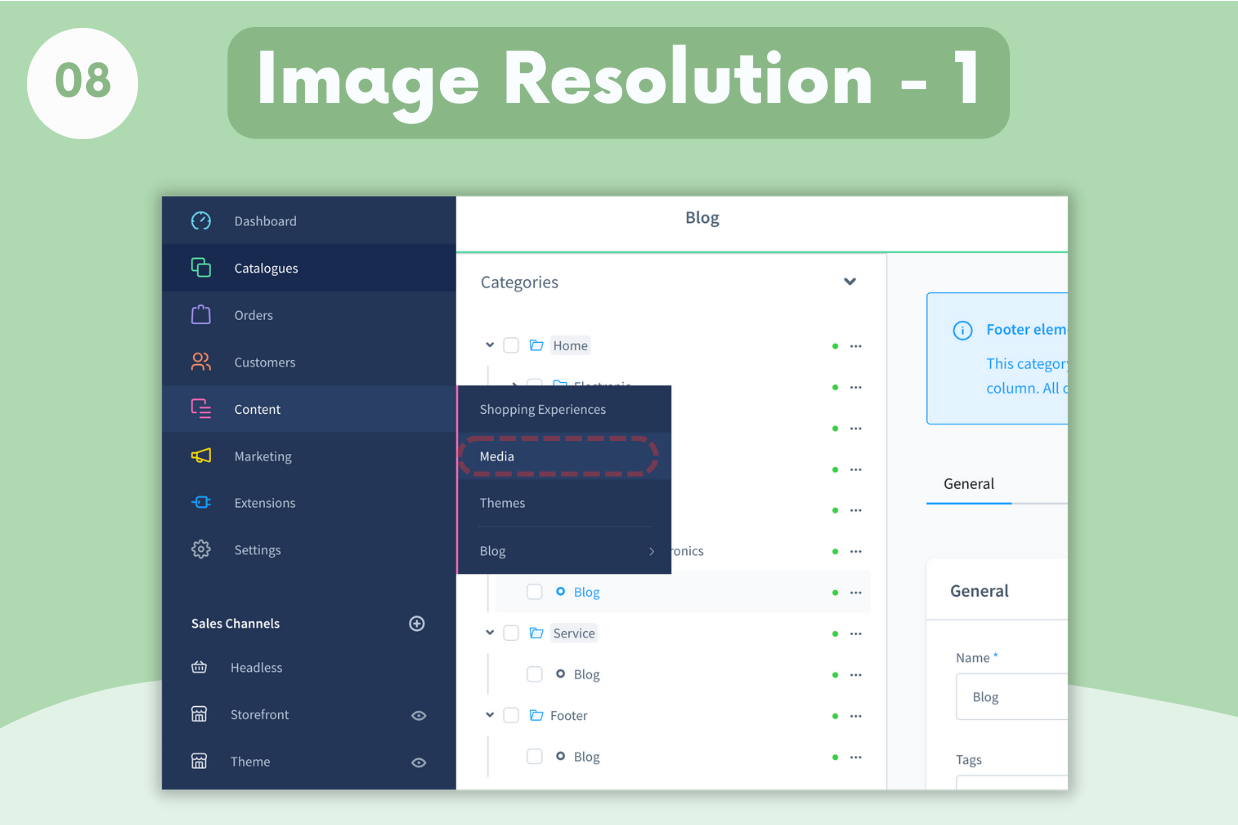
Images uploaded automatically or manually uploaded in the Blog Editor are stored in the Blog Media folder.
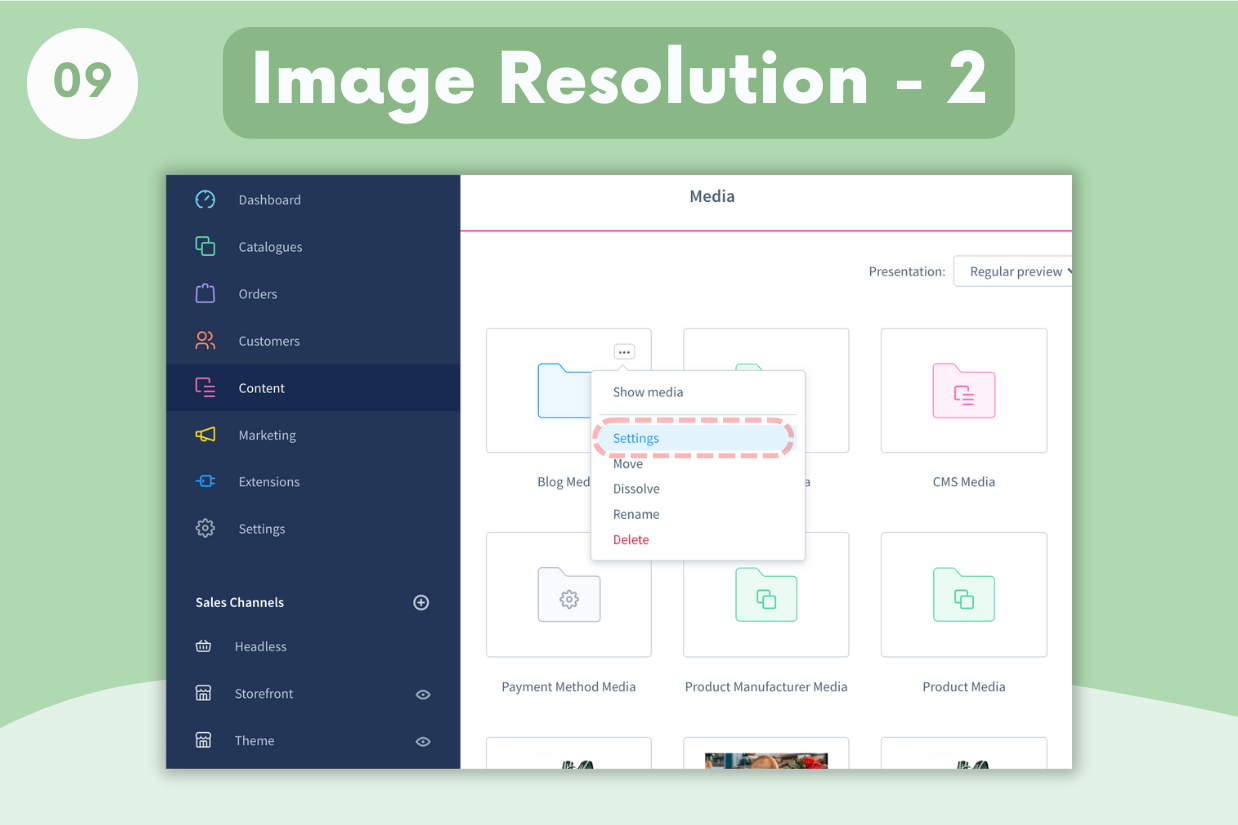
At this stage, we click the Settings button from the dropdown menu of Blog Media folder.
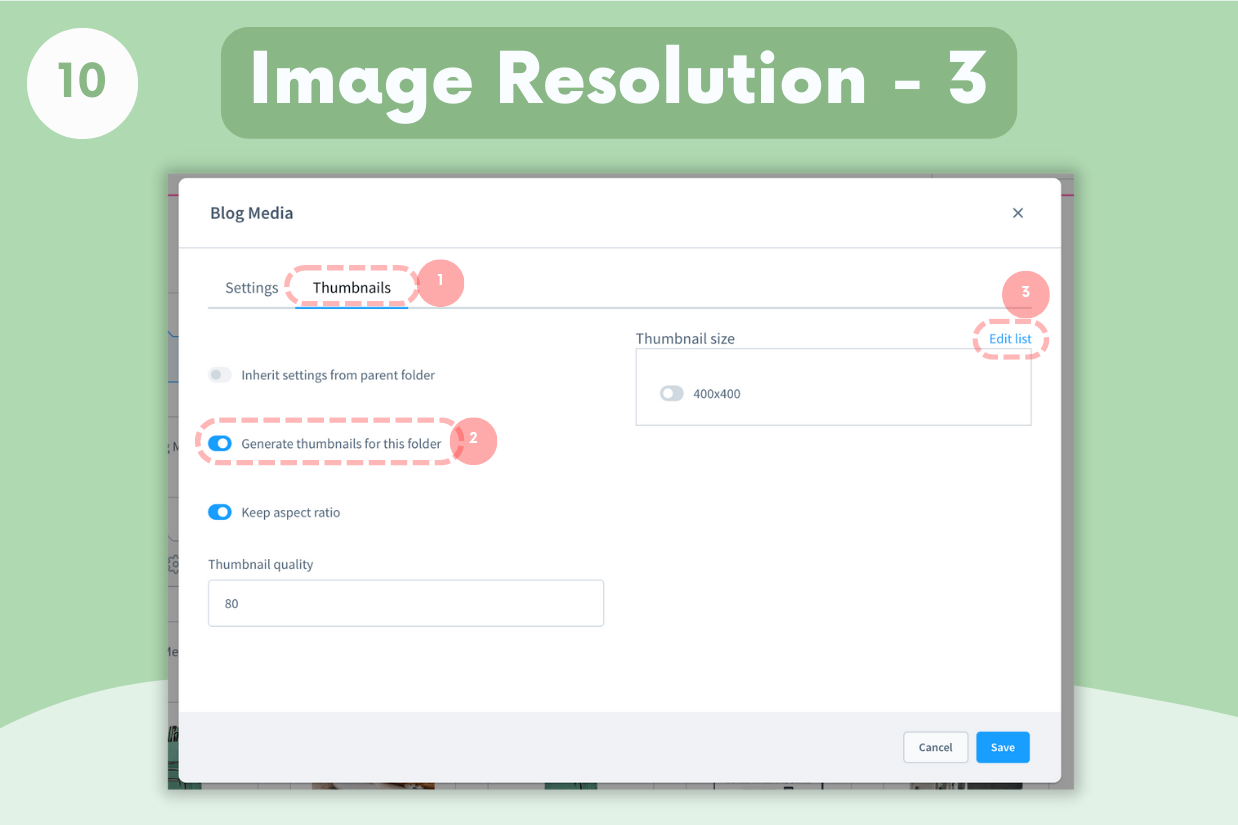
- Click on Thumbnails from Tabs.
- We activate the Generate thumbnails for this folder setting.
- Click Edit list in the Thumbnails area.
We can now add new resolutions to the list.
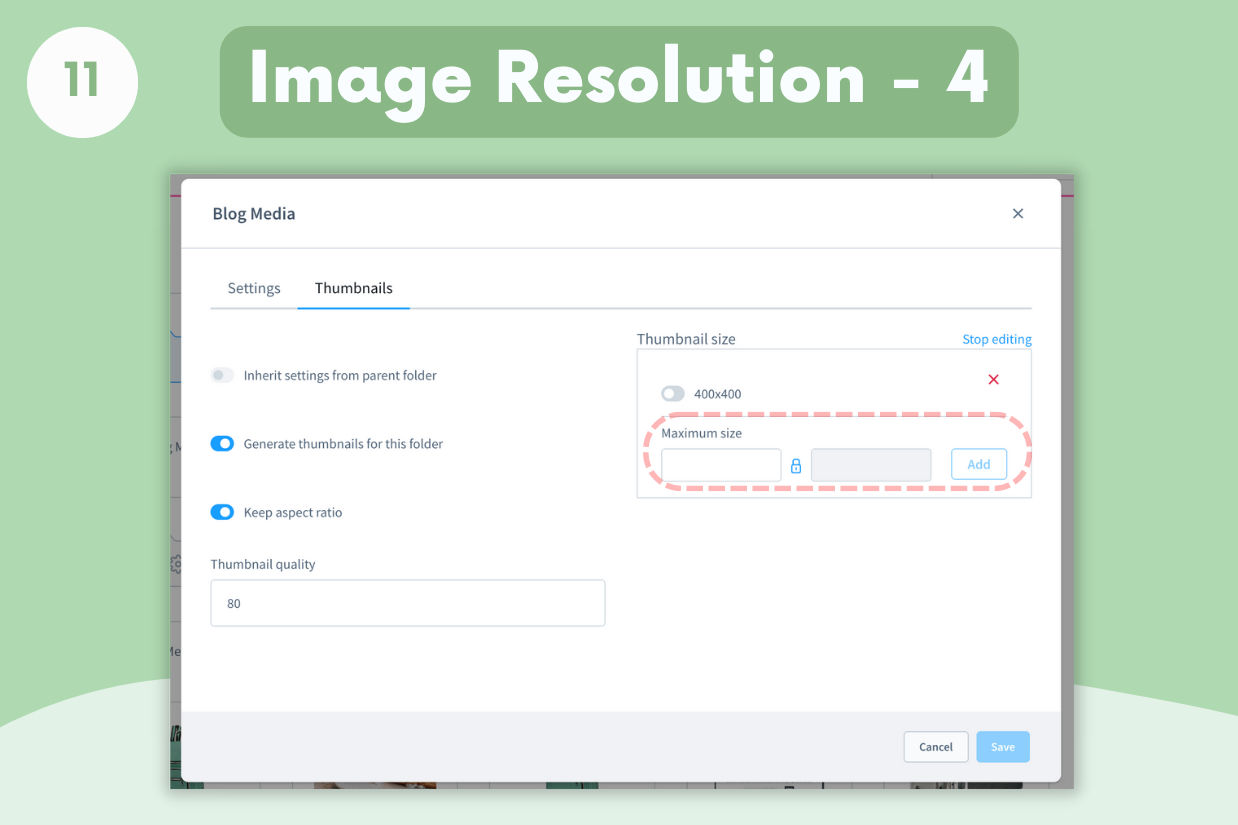
Here we will use Maximum size field to add new resolutions.
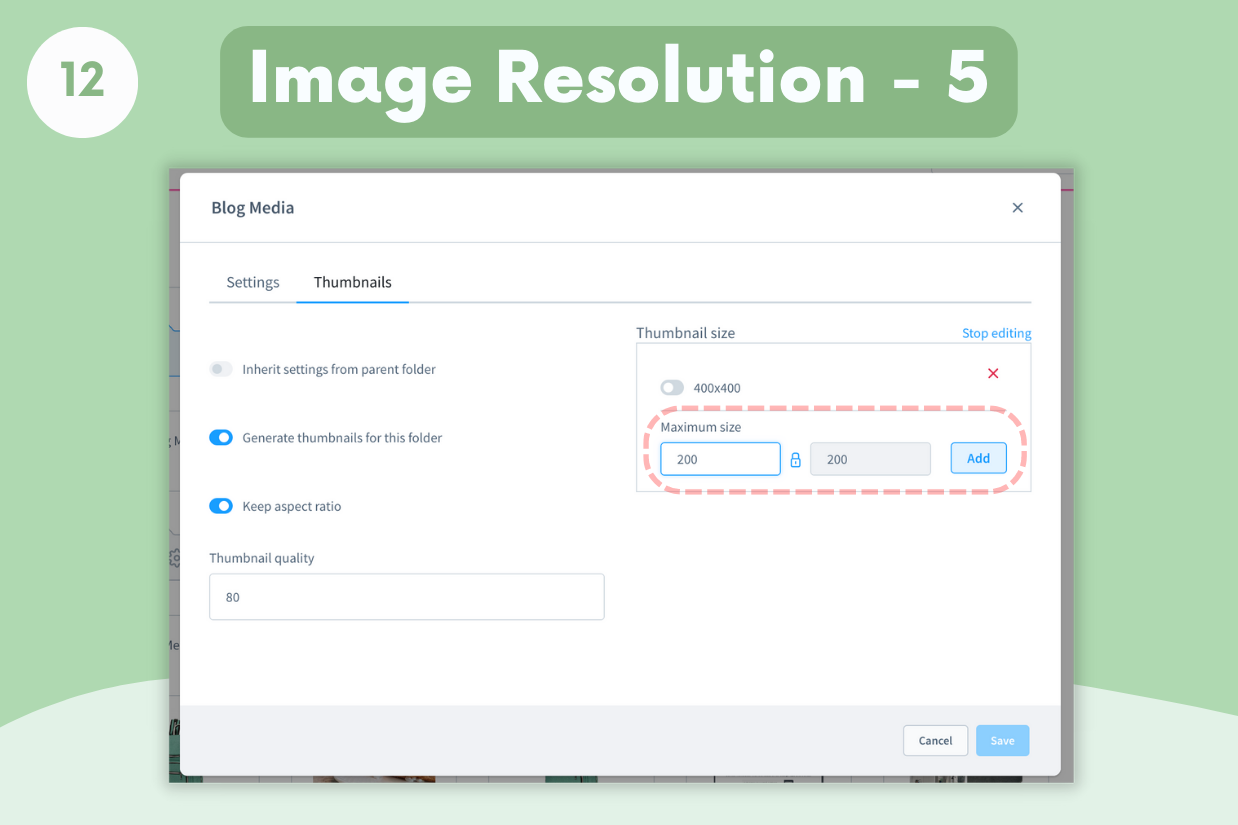
- 200x200
- 300x300
- 400x400
- 600x600
- 800x800
- 1000x1000
We add these resolutions. These are the resolutions that Ongrano Blog Pro frequently uses for different devices and resolutions.
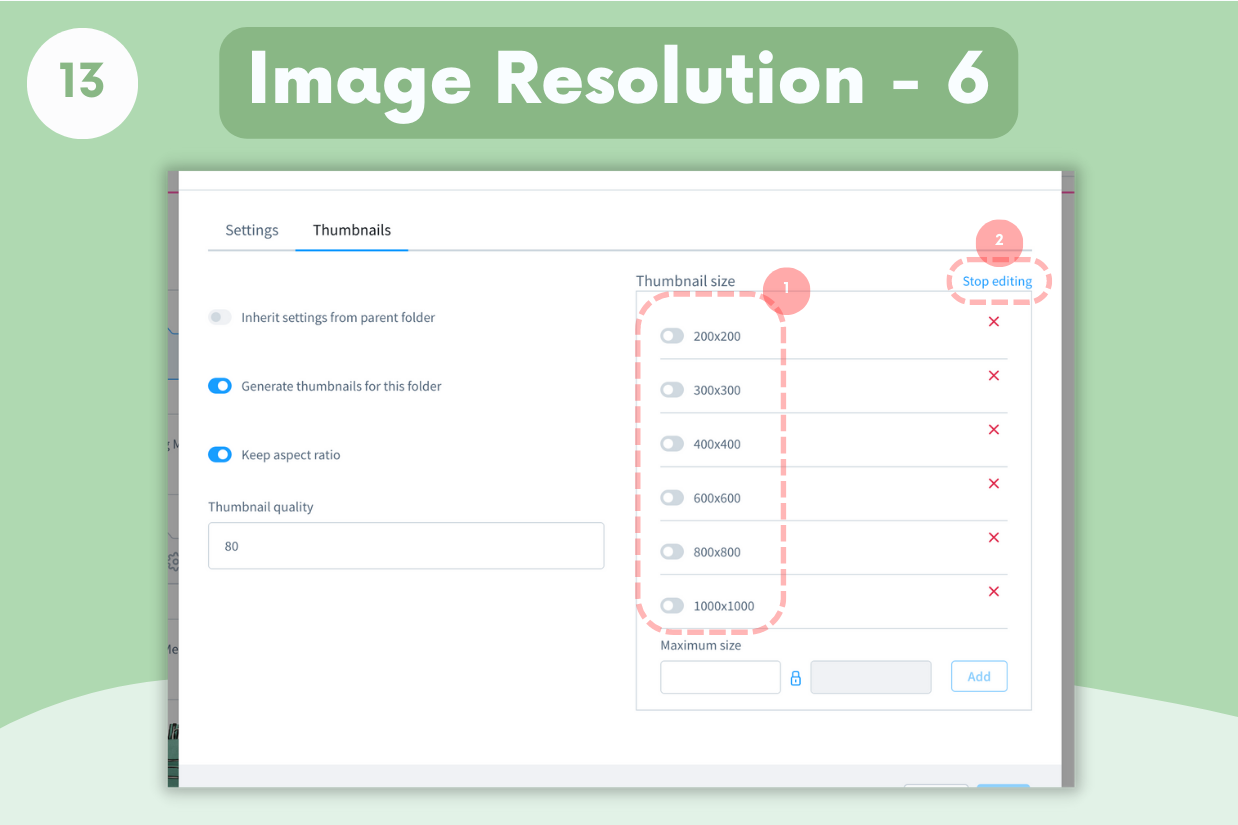
After adding the values it should be like this. Then we click the Stop editing button to end the adding process.
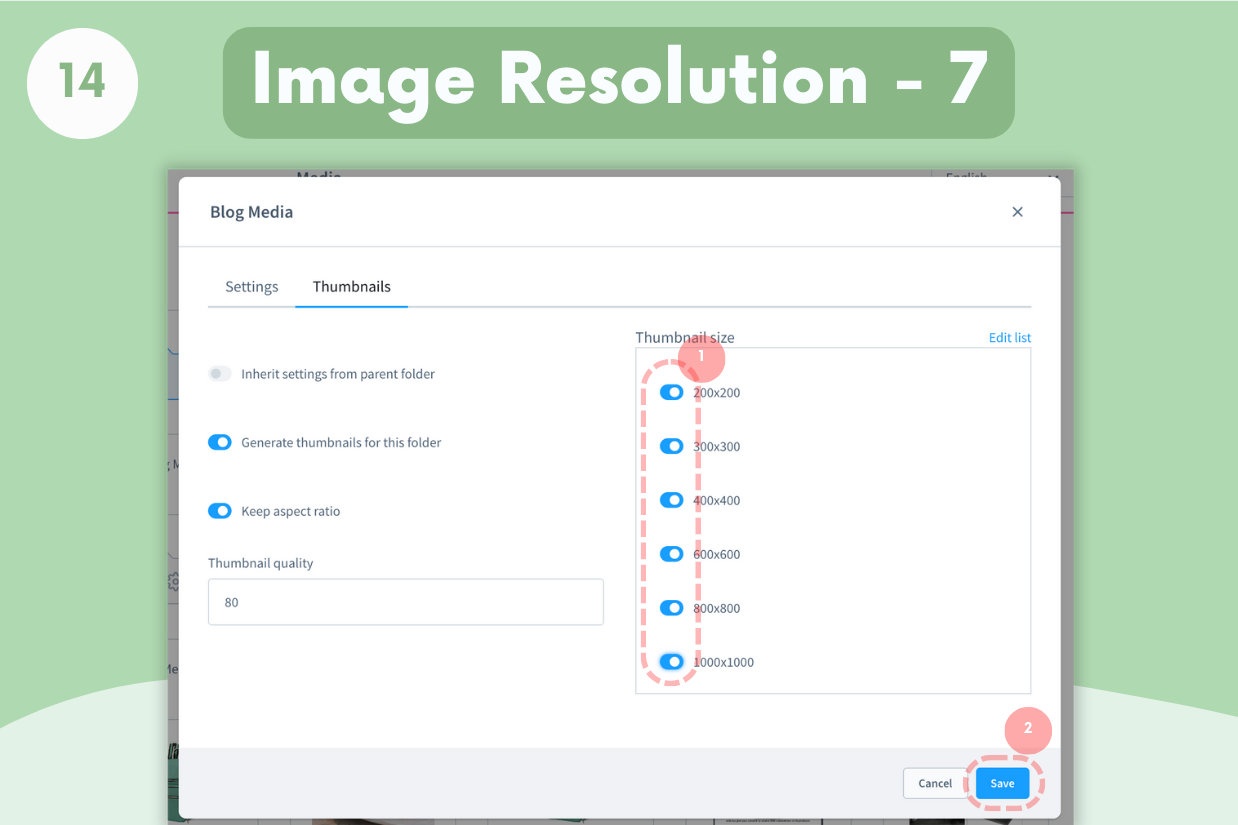
- We activate all the resolutions we added.
- We click the Save button to save all our transactions.
After these settings, Shopware will generate images at the resolutions we give for each image we upload. And we will get good results as best practices
Setting Up Blog SEO Url Templates
Ongrano Blog Pro supports seo url template system for both blog pages and blog category page. With blog variables, you can arrange the most suitable templates for your use in these areas.

By default, blog pages are set as blog category name + blog title. Blog category pages are defined as category names only. You can see which variables you will use with possible variables and you can make adjustments by selecting them.
- Blog page SEO Url Template and their Possible variables
- Blog Category Page Url Template and their Possible variables
Creating First Blog Category
The Blog Category is required to create a blog. The first job is to create a blog category, then we can start creating content. To do this;
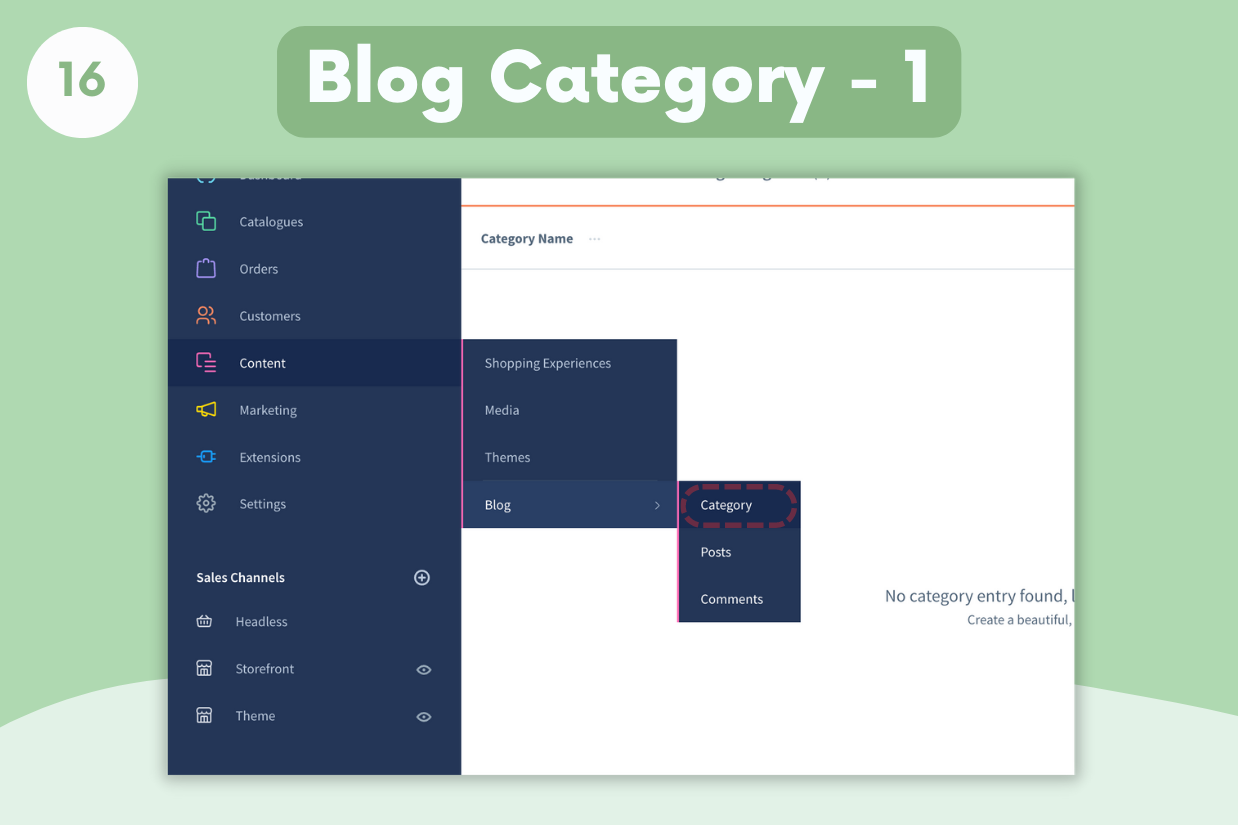
You will see all categories listed on the category page. For now it must be empty. We need to create one. For creating new category simply Add New Category button.
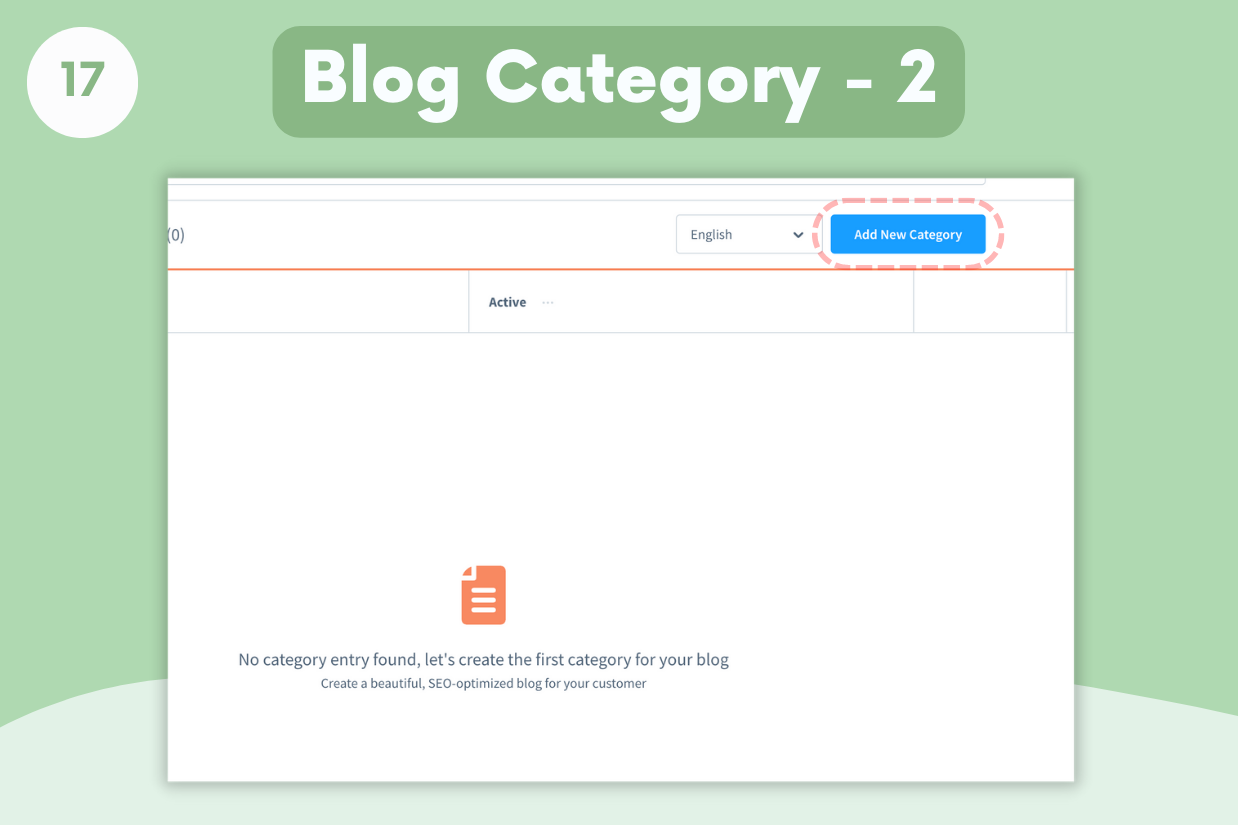
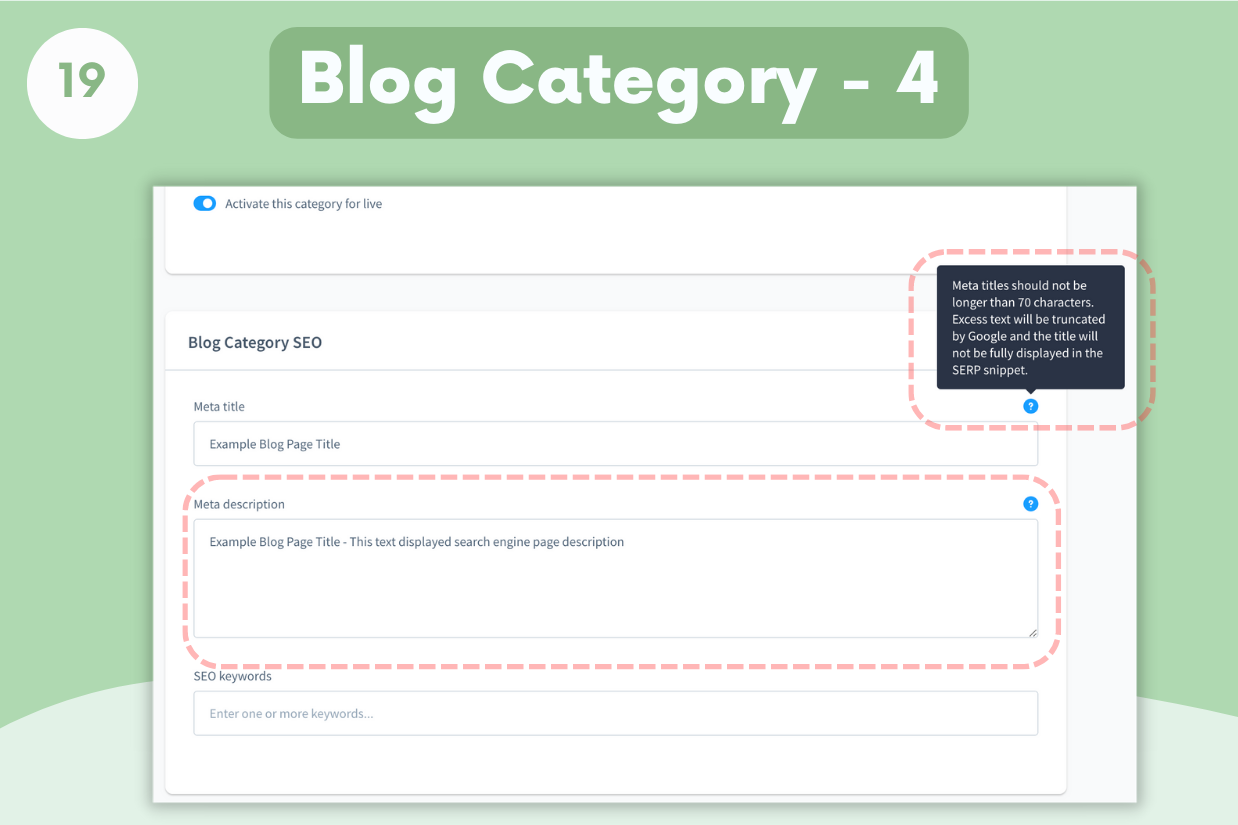
You can find warnings and helpful texts that will guide you on the category creation page.
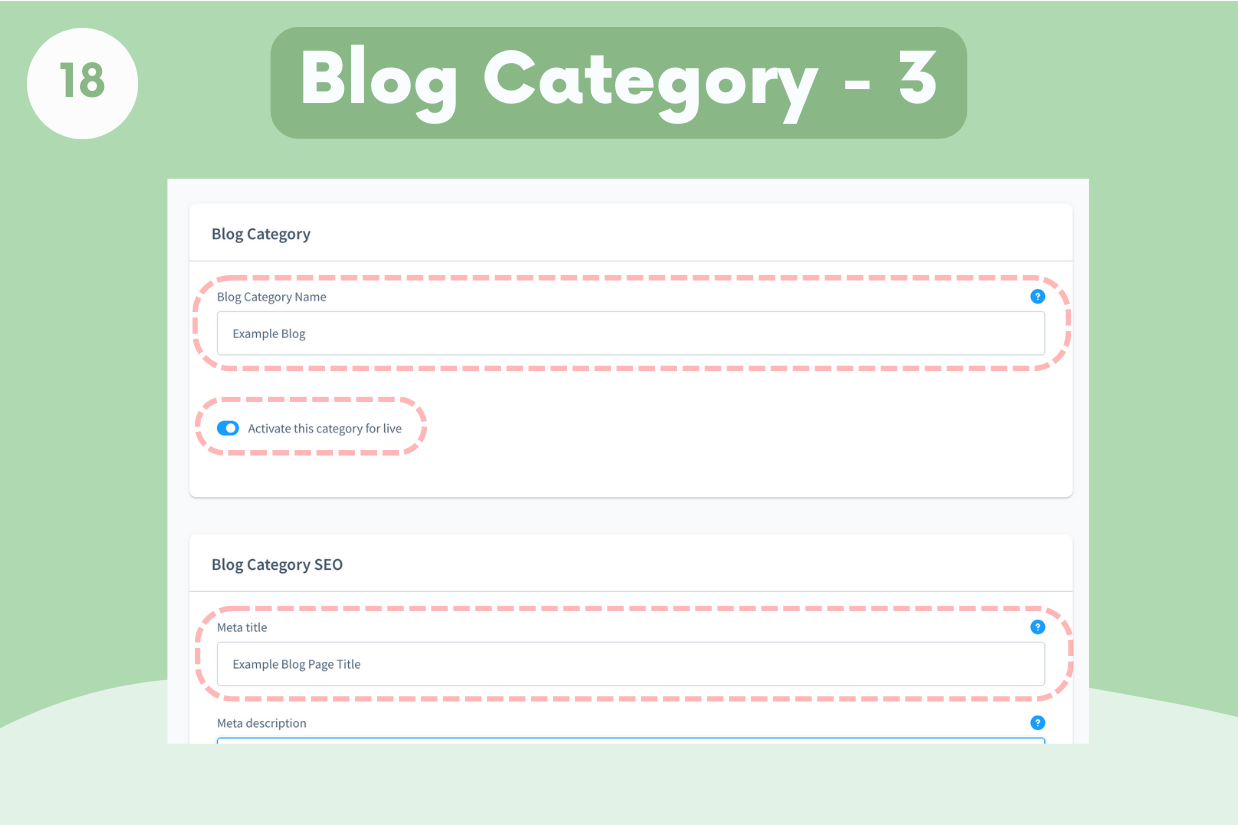
When choosing the category name, remember that the category name is used in the SEO link.
It can be helpful to check the help texts when creating the Blog Categories. In this field, we enter the SEO information.
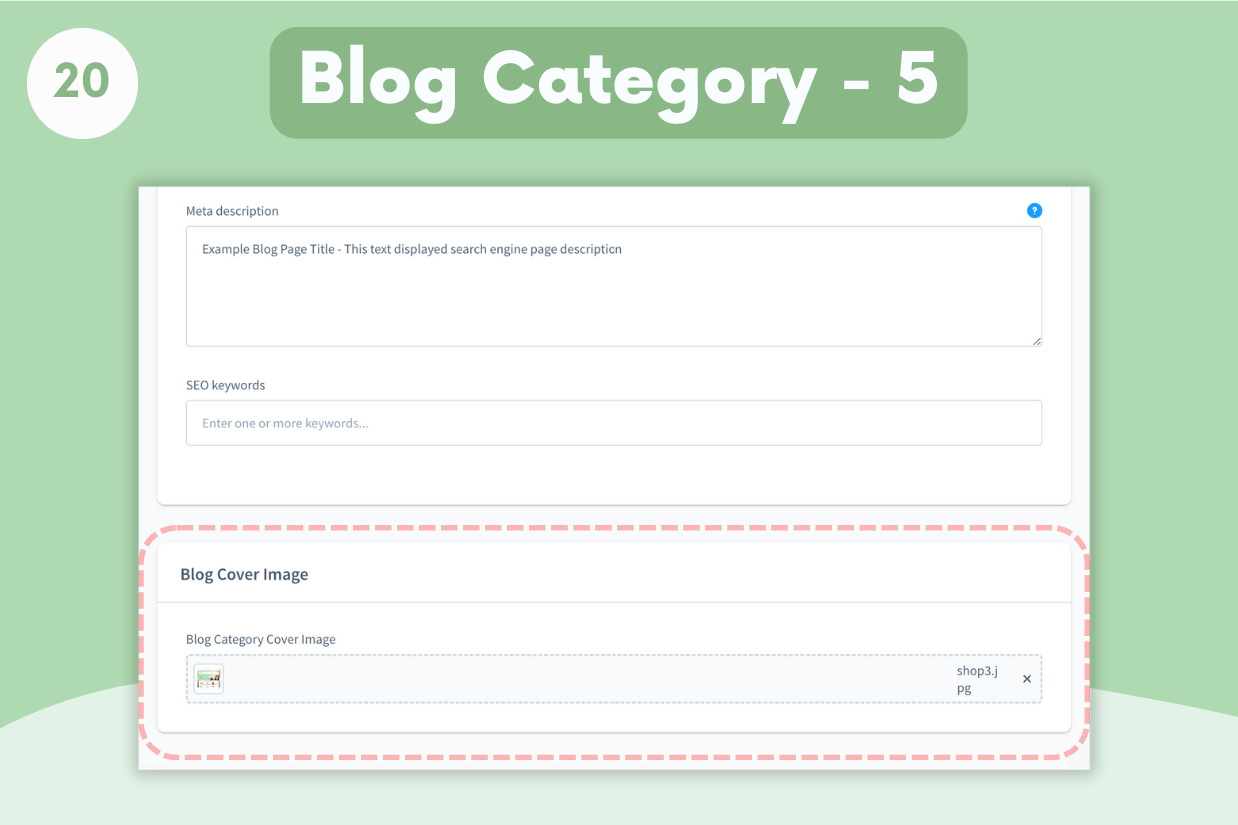
In this area, we choose the Blog Category Cover image. These photos will be used both in Searh Engines and while sharing in social media. We have come to the end of the category adding process. it's that simple.
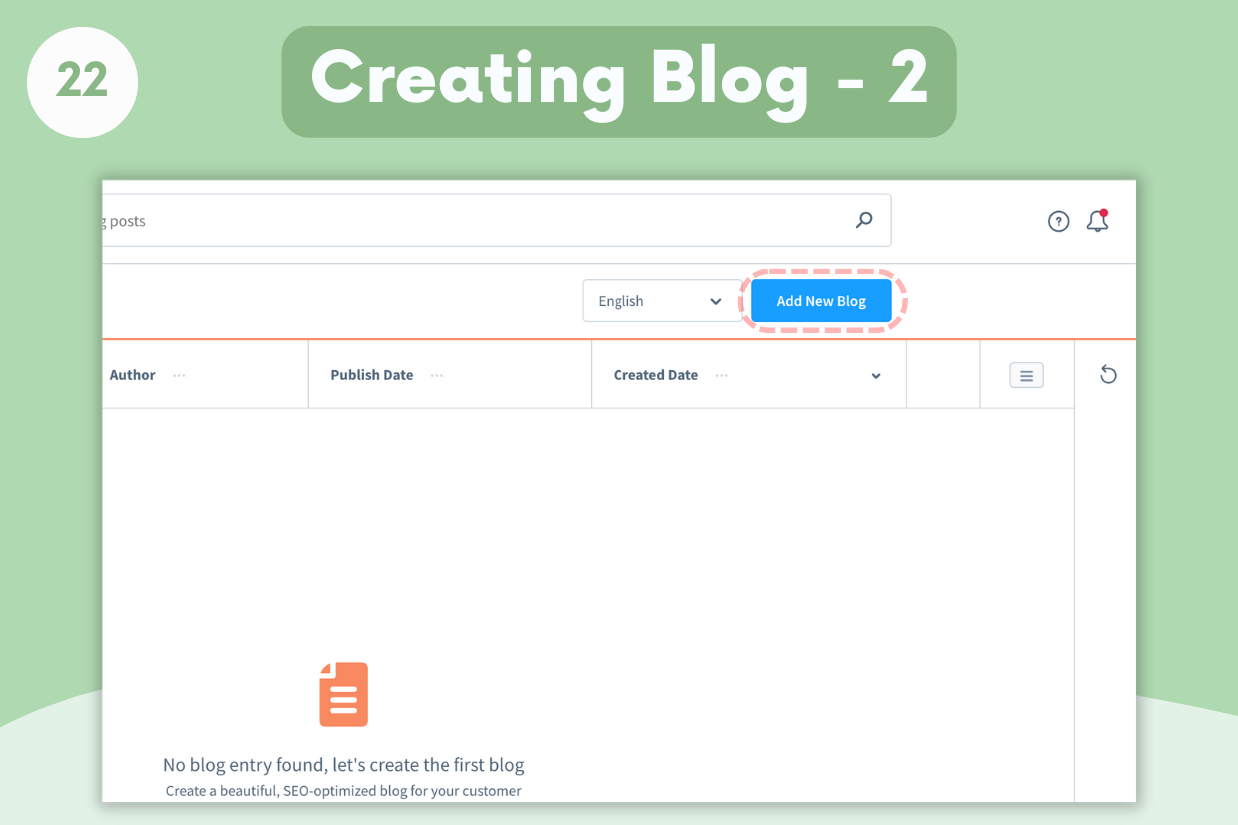
Creating First Blog Post
Creating a blog is as simple as a category. Let's dive in.
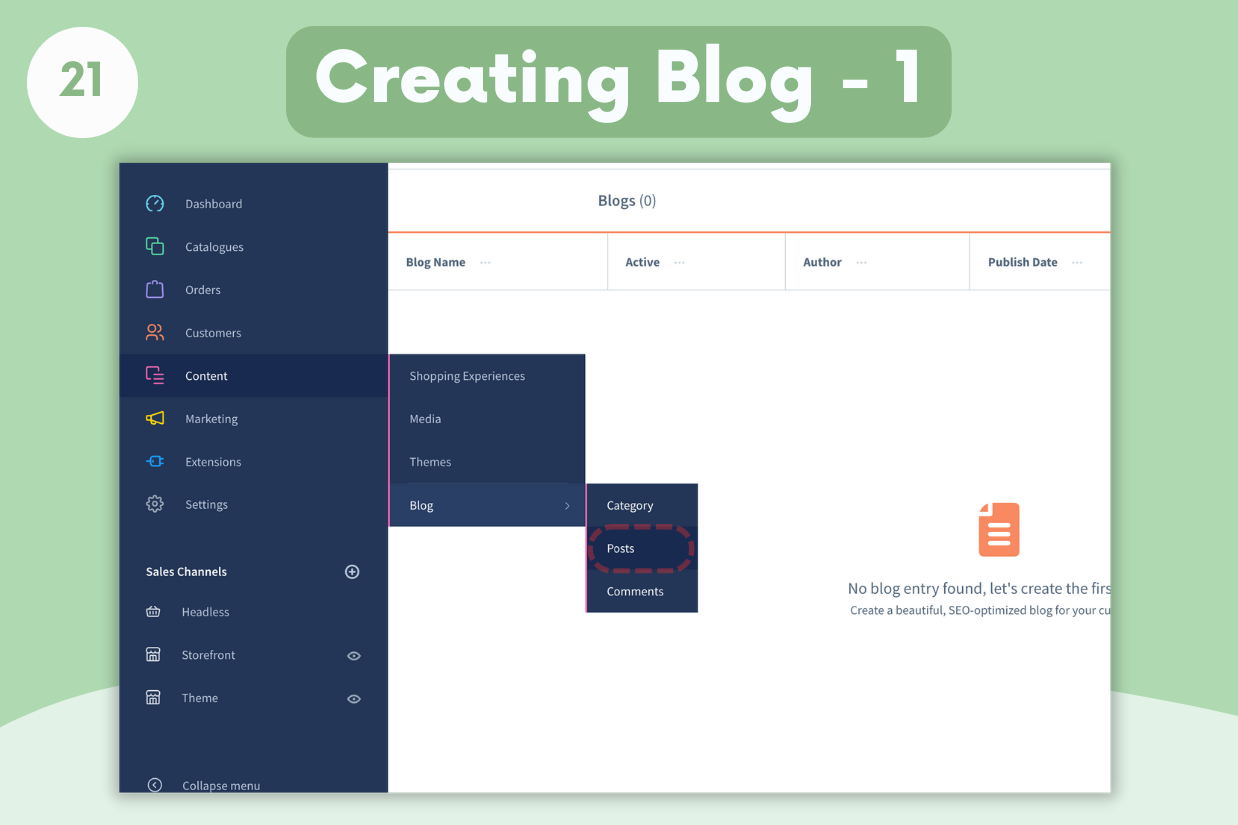
In this page we can see all list of blog that we created before.
On our blog detail page, there are SEO and Blog previews, warnings on fields that are entered incorrectly or left blank. This will help you write a blog suitable for Search engines. Making use of helpful texts in the input fields will allow you to blog better.
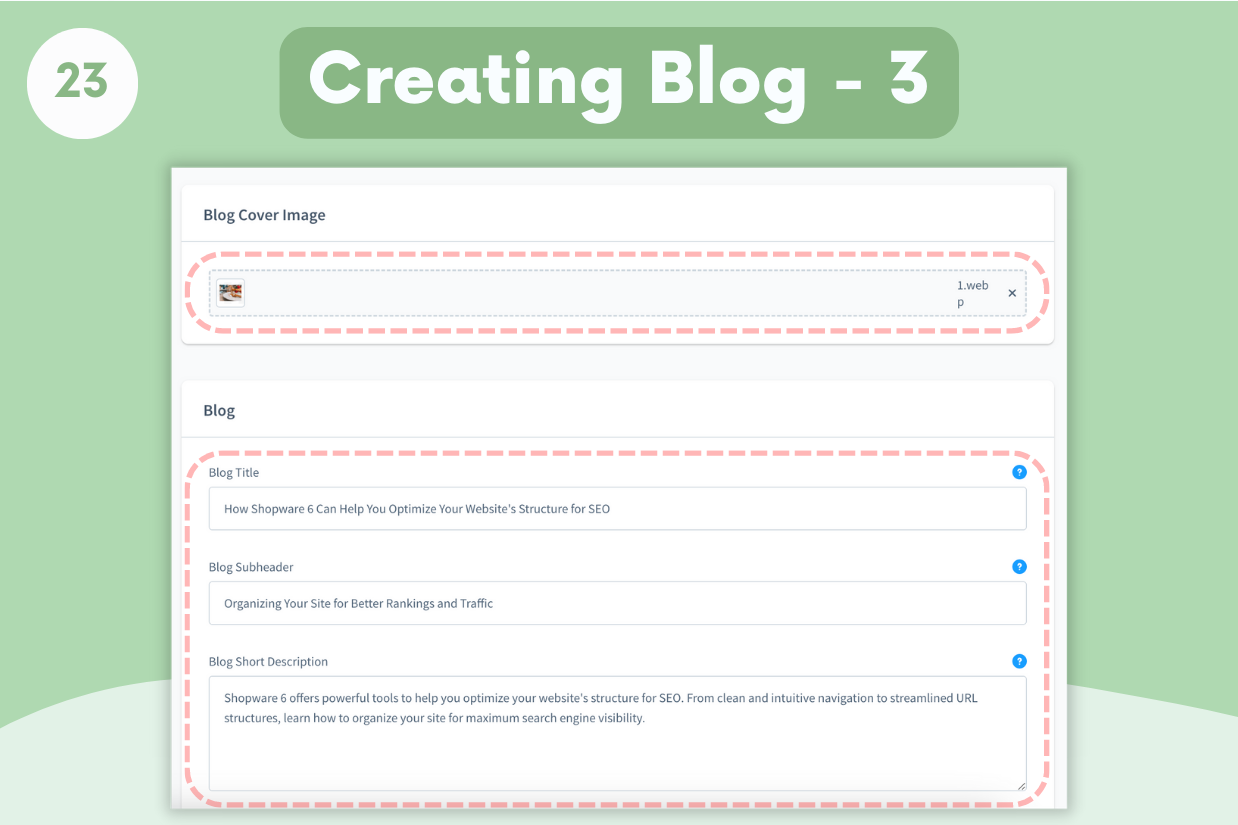
- Blog Cover: This cover image is shown in blog listings, search engines and social shares.
- Blog title: The blog title is the most important thing when writing a blog. The SEO URL is created with the blog title. It is used with the title h1 tag on the blog page and we do not allow other h1 usage. Thus, we can experience better SEO result.
- Blog Sub header: It is shown as a sub header in the blog listing and is given to search engines as a sub header.
- Blog short description: It is a short summary of the blog in a few sentences in the blog listing.
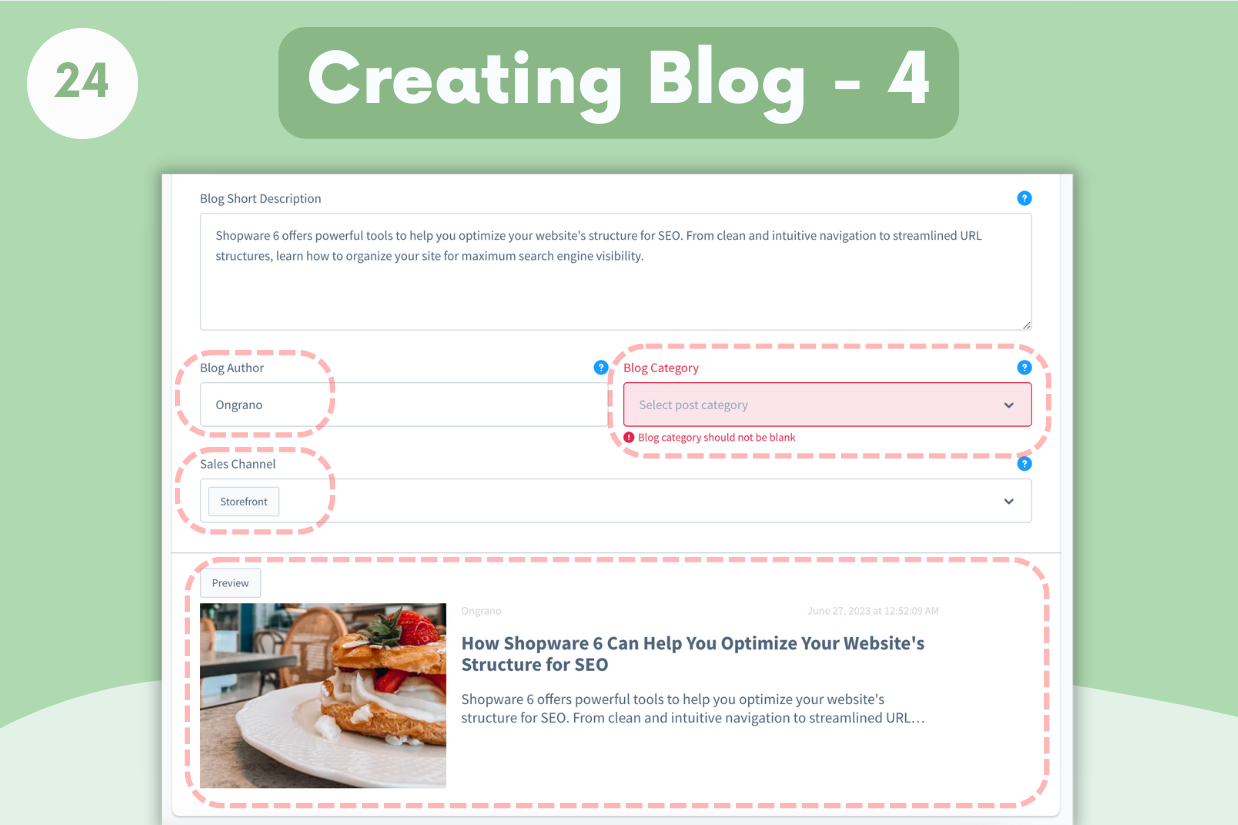
- Blog Author: Shown as the author of the blog.
- Blog Category: It is the category that the blog belongs to and is also used when creating the SEO Url and the Blog is only displayed in this category.
- Sales Channel: It is the store selection where the blog will be displayed. This blog post is shown in selected stores. While blog posts like news can be shared across multiple stores. For blogs such as traffic and product promotion, it is important for SEO to only be displayed in a store so that there is no duplicate content.
Tip: You can check the information from the preview and have information about how it will look.
Tip: Incorrect and blank fields will inform you as they appear. So you can get better results.
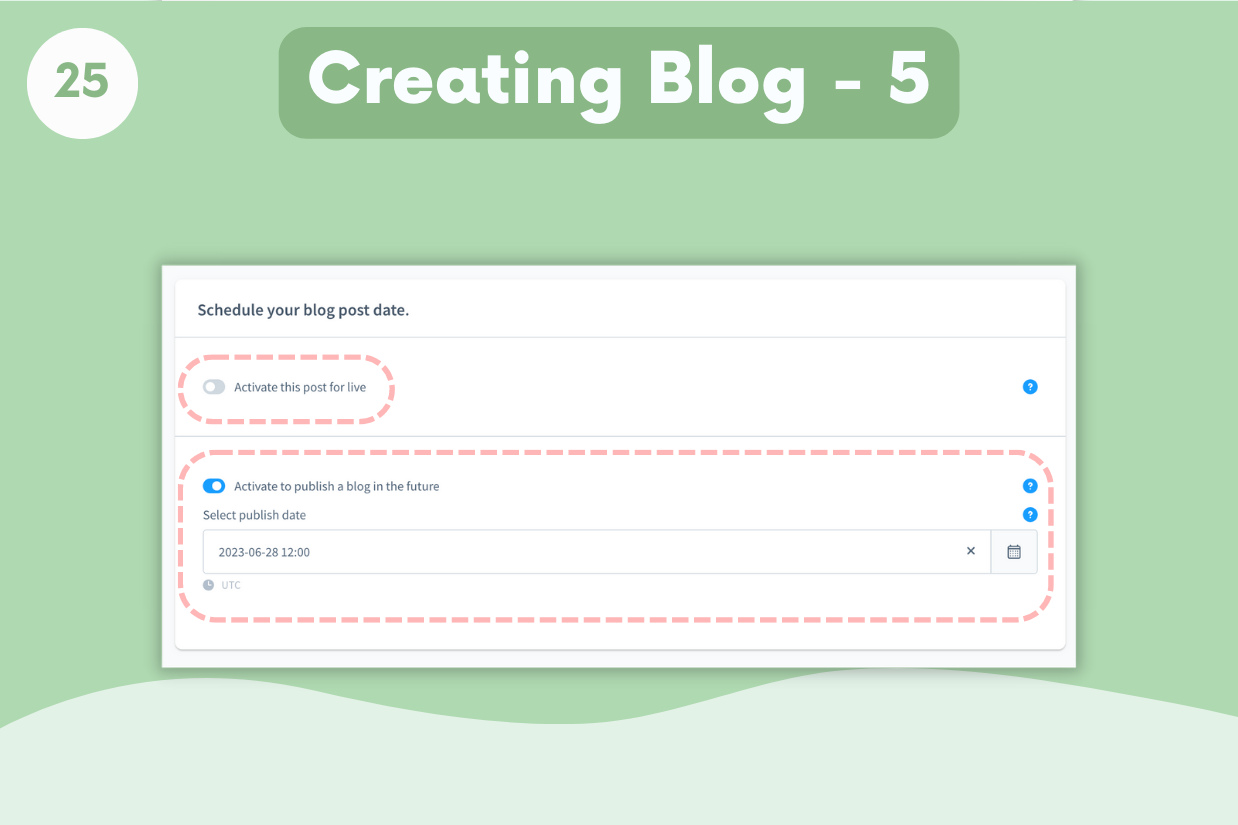
You can publish your blog post instantly, or you can use the scheduler to publish it at a later date.
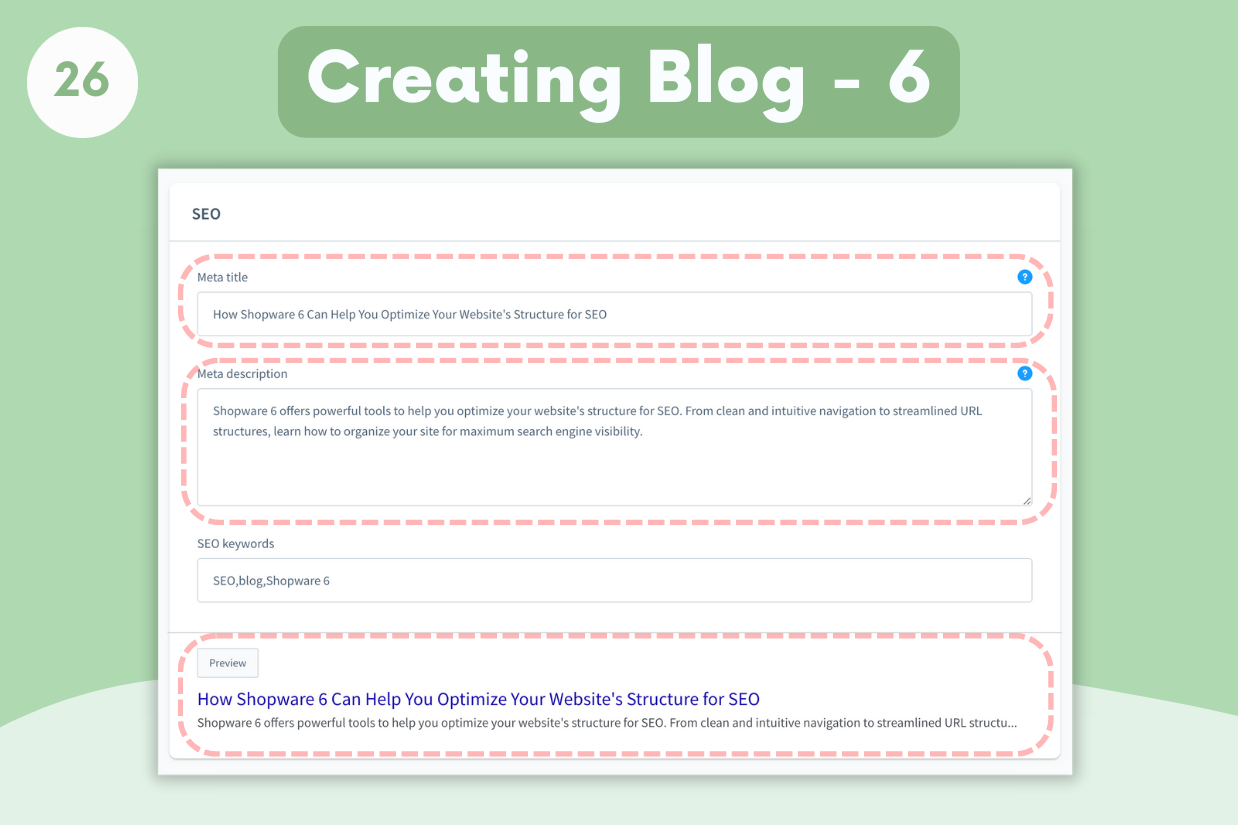
- Meta title: It is displayed as a title in search engines and is also the title of the page. Information about character lengths is in the help texts.
- Meta Description: It is displayed as a description in search engines. Information about character lengths is in the help texts.
Tip: These fields should be written in such a way that they are meaningful and of interest to your customers. Search engines may ignore repetitive and meaningless meta titles and meta descriptions.
Tip: You can take a look at a preview of how it will appear in search engines.
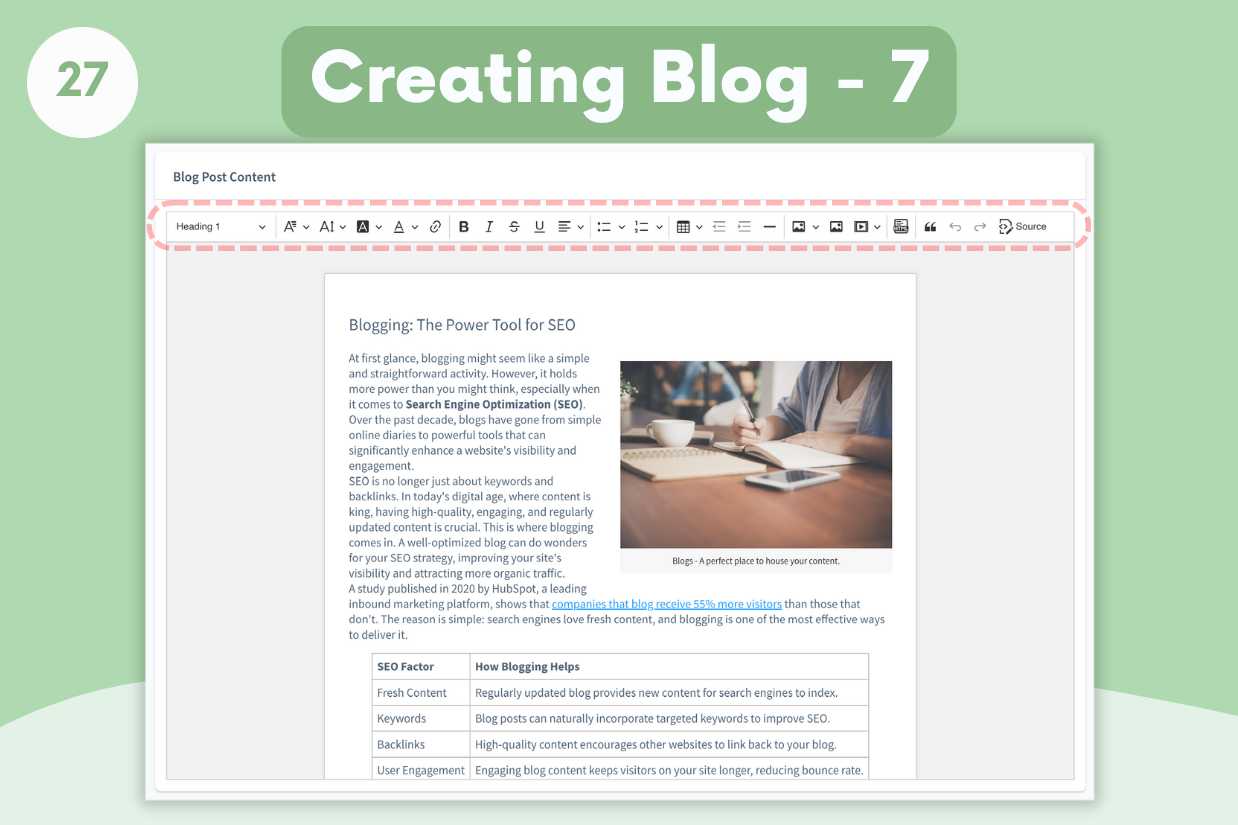
Ongrano Blog Advanced Editor
Ongrano Blog Editor is a very useful and powerful WYSIWYG editor. It is fully compatible with Office programs, you can move it with copy paste and you can add pictures from your computer with just copy and paste. The following table describes the editor's tools.
| Tool | Description |
|---|---|
 | Paragraph, (h2) Header 1, (h3) Header 2, (h4) Header 3 can be used. |
 | Font family selection. By default, your theme's font is used. It is also offered in fonts found in every operating system such as Arial, Courier New, Georgia, Lucida Sans Unicode, Tahoma, Times New Roman, Trebuchet MS, Verdana and can be used when creating a blog. |
 | Font size selection. Tiny(10px), small(12px), default(14px), big(20px) and huge(26px) represent the font size. |
 | Text background color selection. Many preset color can be used. |
 | Text color selection. Many preset color can be used. |
 | Used to add url to text. |
 | Bold, Italic, strikethrough, underline |
 | Text Alignment |
 | Bullet List |
 | Number List |
 | Table |
 | Image Upload from your computer |
 | Add image with url |
 | Add video with url (Youtube) |
 | Custom Html code and javascript code can be added. For example, twitter embedded publish code. |
 | Block quote |

| You can do forward and backward actions in the editor. |
 | You can make changes in the Editor to the Source HTML code. |
Ongrano Blog Pro is an indispensable plugin to increase your traffic and reach more customers with its advanced editor and guidance tools. In this article, we covered the step-by-step process from the initial setup of Ongrano Blog Pro to publishing a blog post. See you in other Ongrano product promotions and informative articles. Stay tuned.
Comments(0)